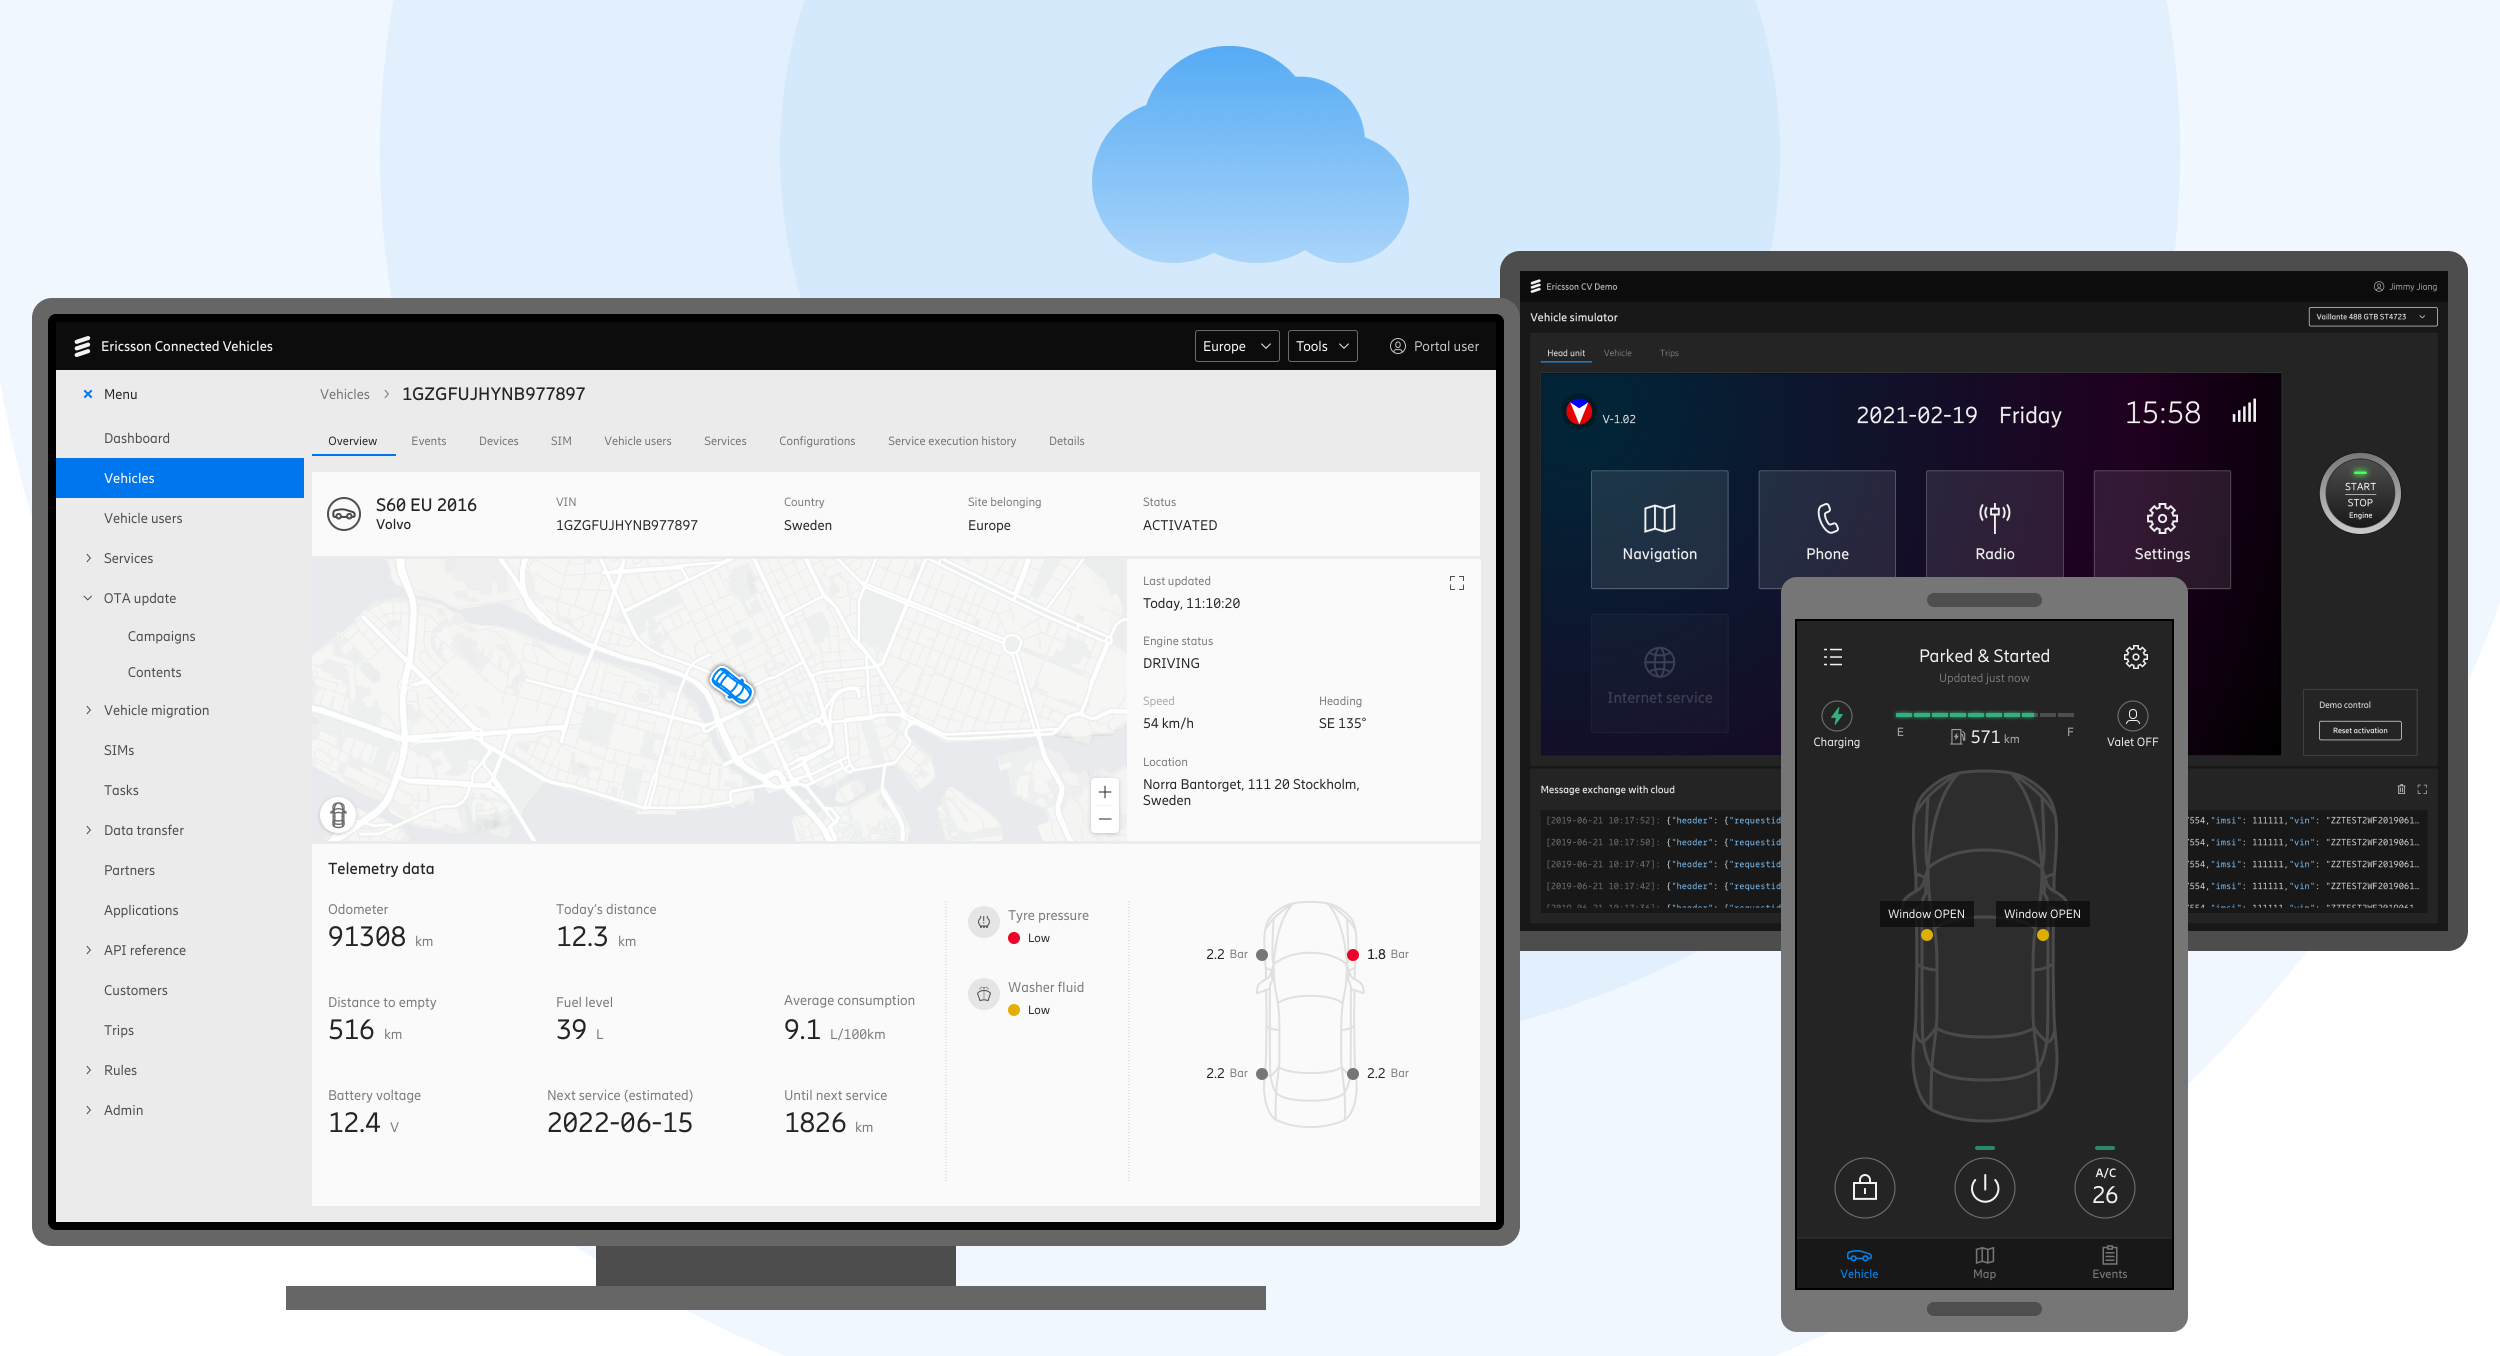
Built for automotive manufacturers, the Connected Vehicles platform connects over 20 million vehicles across 150 countries.
2019 - 2023
UX Designer in a 100+ member team
Product launched. Signed a contract with a European automotive OEM. During delivery phase, the company decided to sell entire IoT business.
Background
Connected Vehicles is a cloud-based platform that enables automotive OEMs to manage their vehicles and services worldwide.
As a dedicated UX designer on this project, I delivered simple yet flexible UX solutions to complex challenges. I collaborated closely with Technical Product Managers, Product Owners and Development Leads to ensure the usability and user-centered quality of final deliverables.
Design Process
The design process started with UX research. We needed to fully understand clients' needs and align our strategy.
Personas
These are the key personas representing various stakeholders within an automotive OEM.
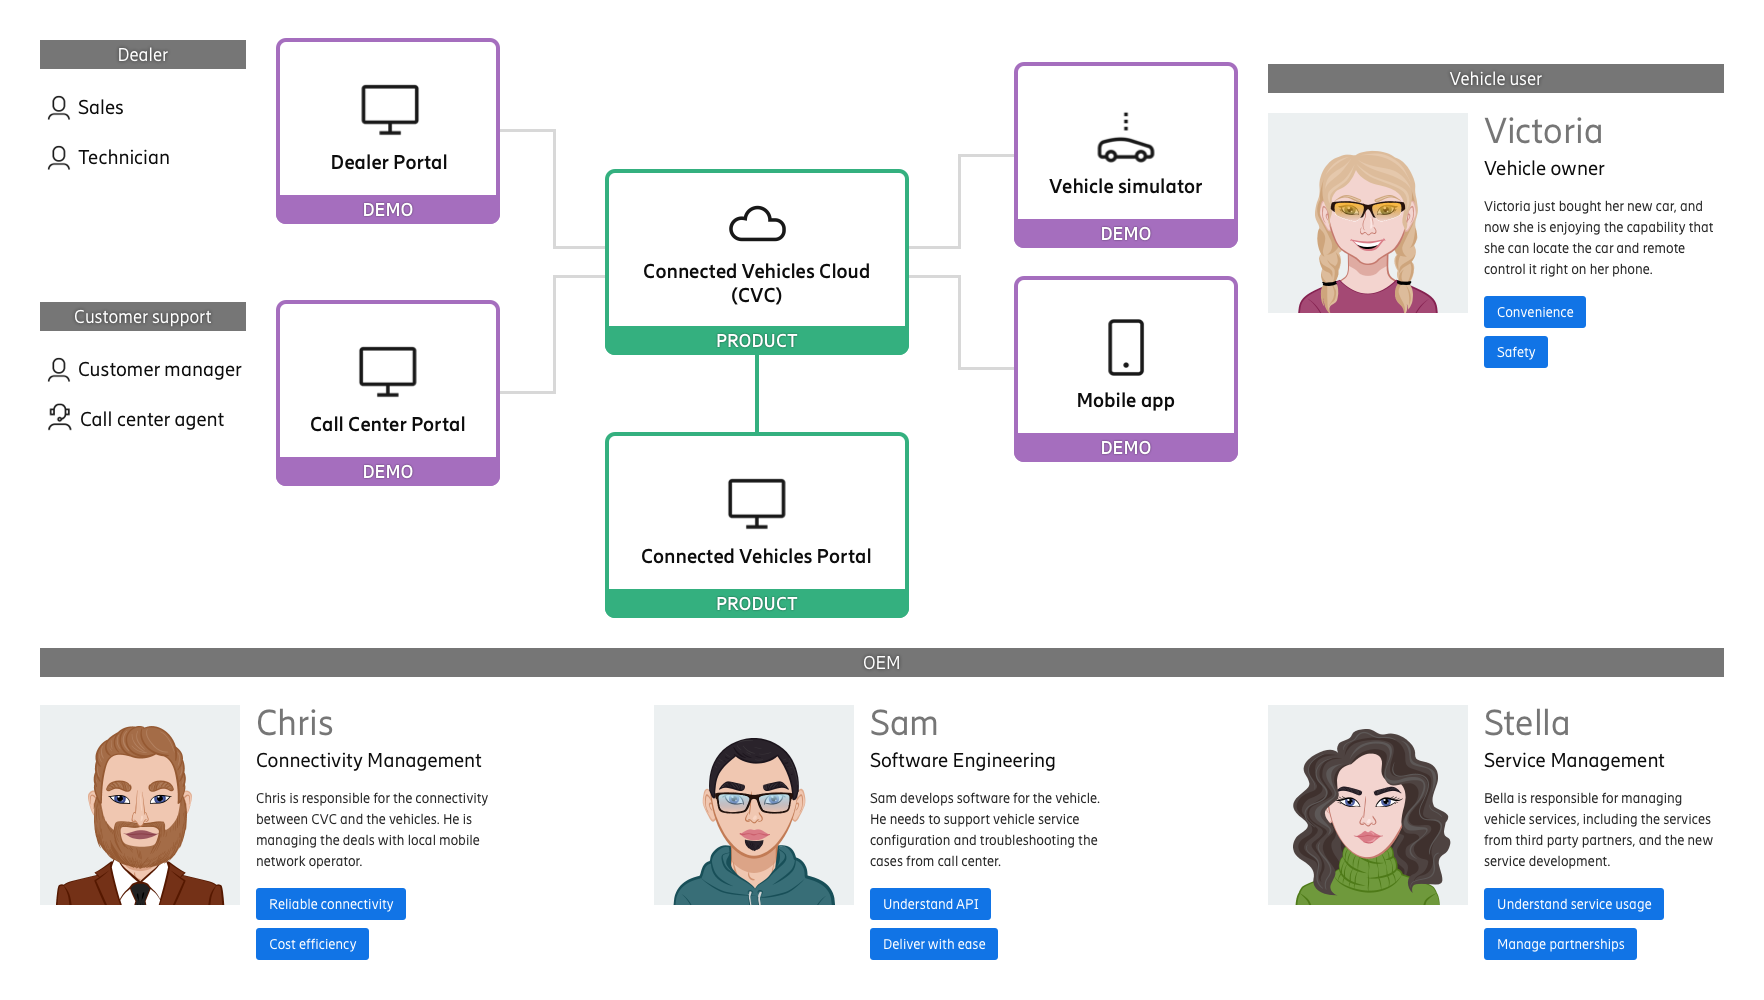
We aligned to the business strategy of breaking down the product into different feature modules, so they can be sold separately. And we defined the overall design goals.
Product Design Goals
- Each feature module can run independently as a product
- The UX need to be intuitive to different roles in automotive OEMs
Journey Map
After defining different feature modules, we dived into each of them to continue the research.
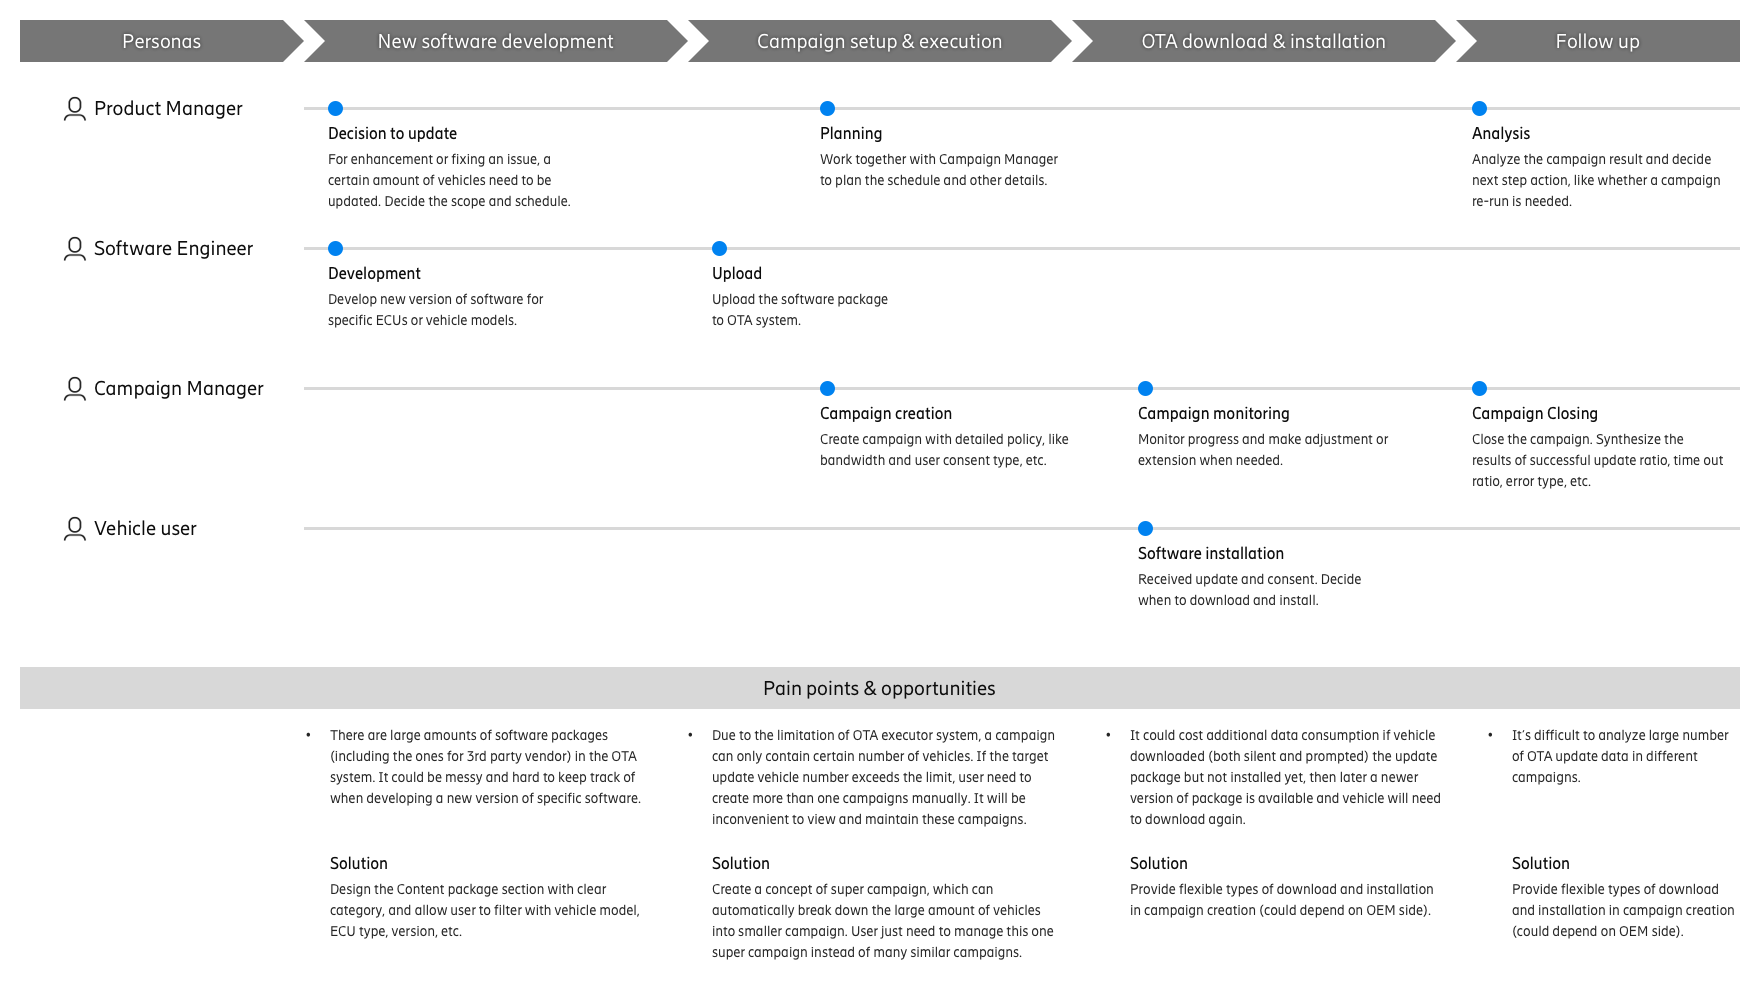
Below is a journey map of the vehicle OTA Update feature module. It shows users' tasks in each step, and the possible pain points, which are also our design opportunities.
Status Flow
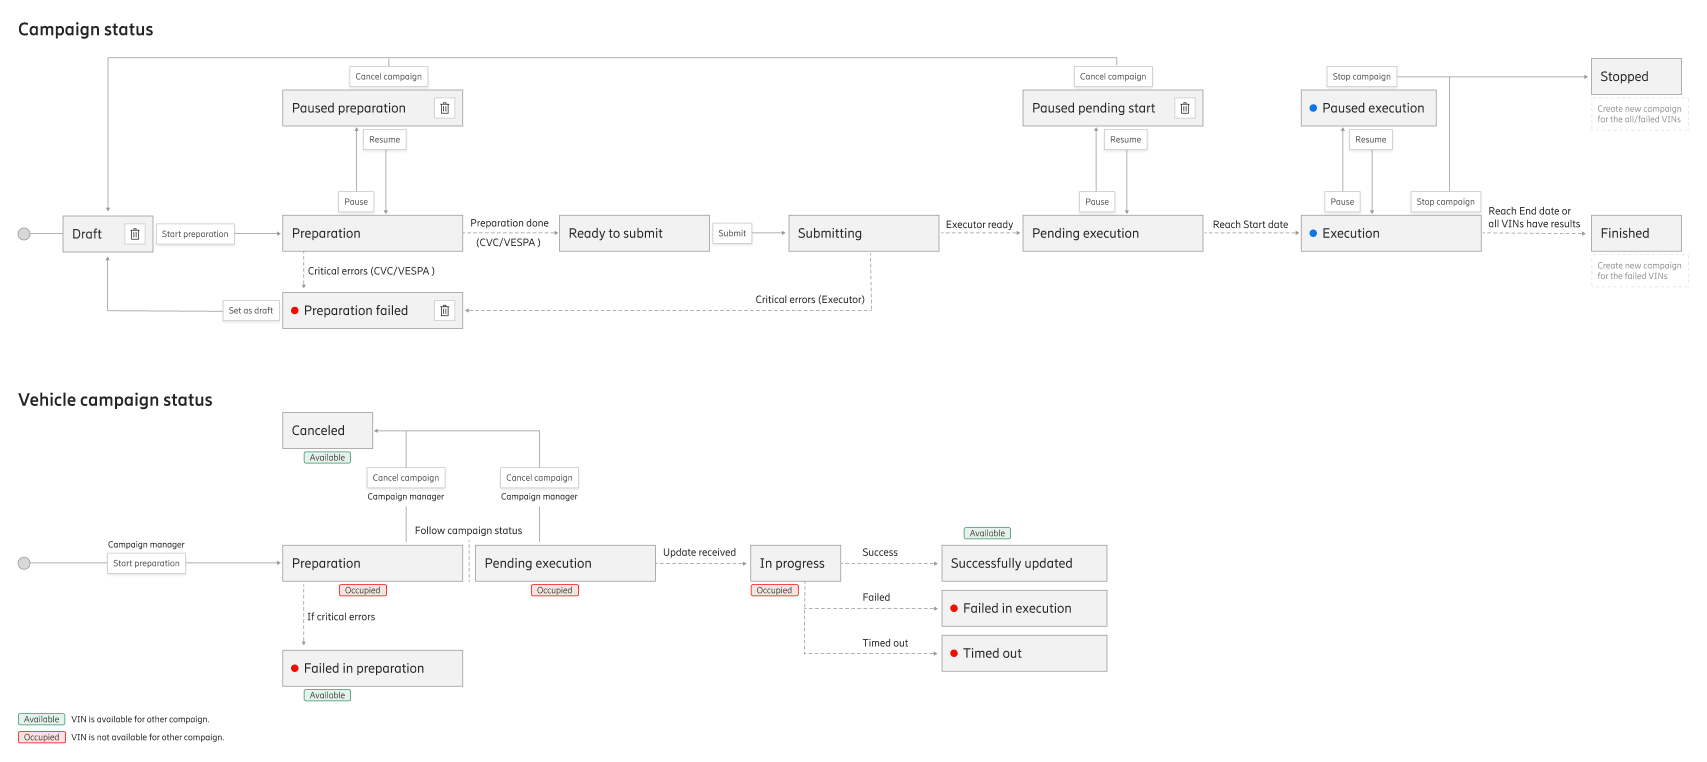
Before moving to wireframes, we defined the main status workflow. Using the OTA Update feature as an example, we defined various campaign statuses and their transitions based on further research.
Interaction & UI
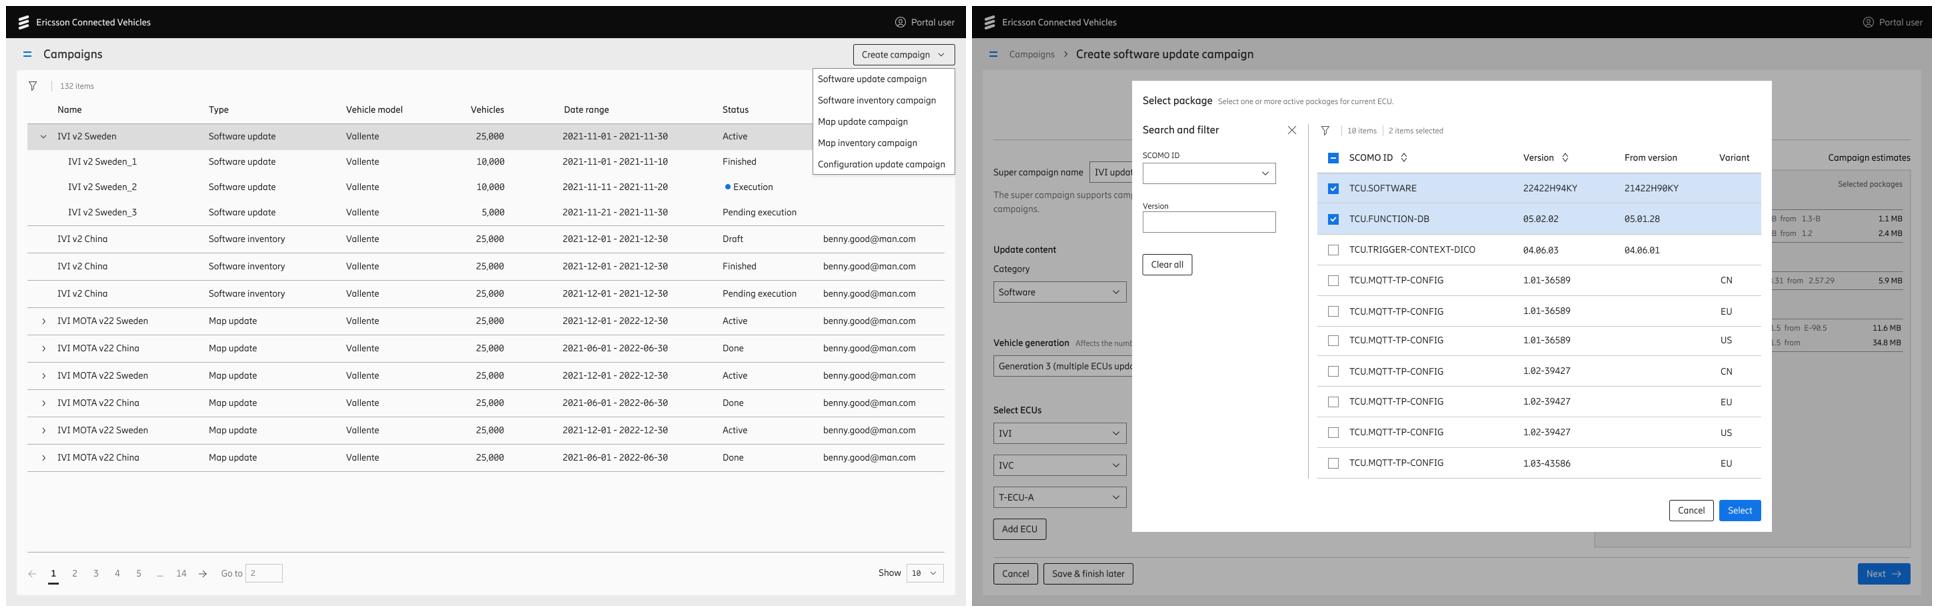
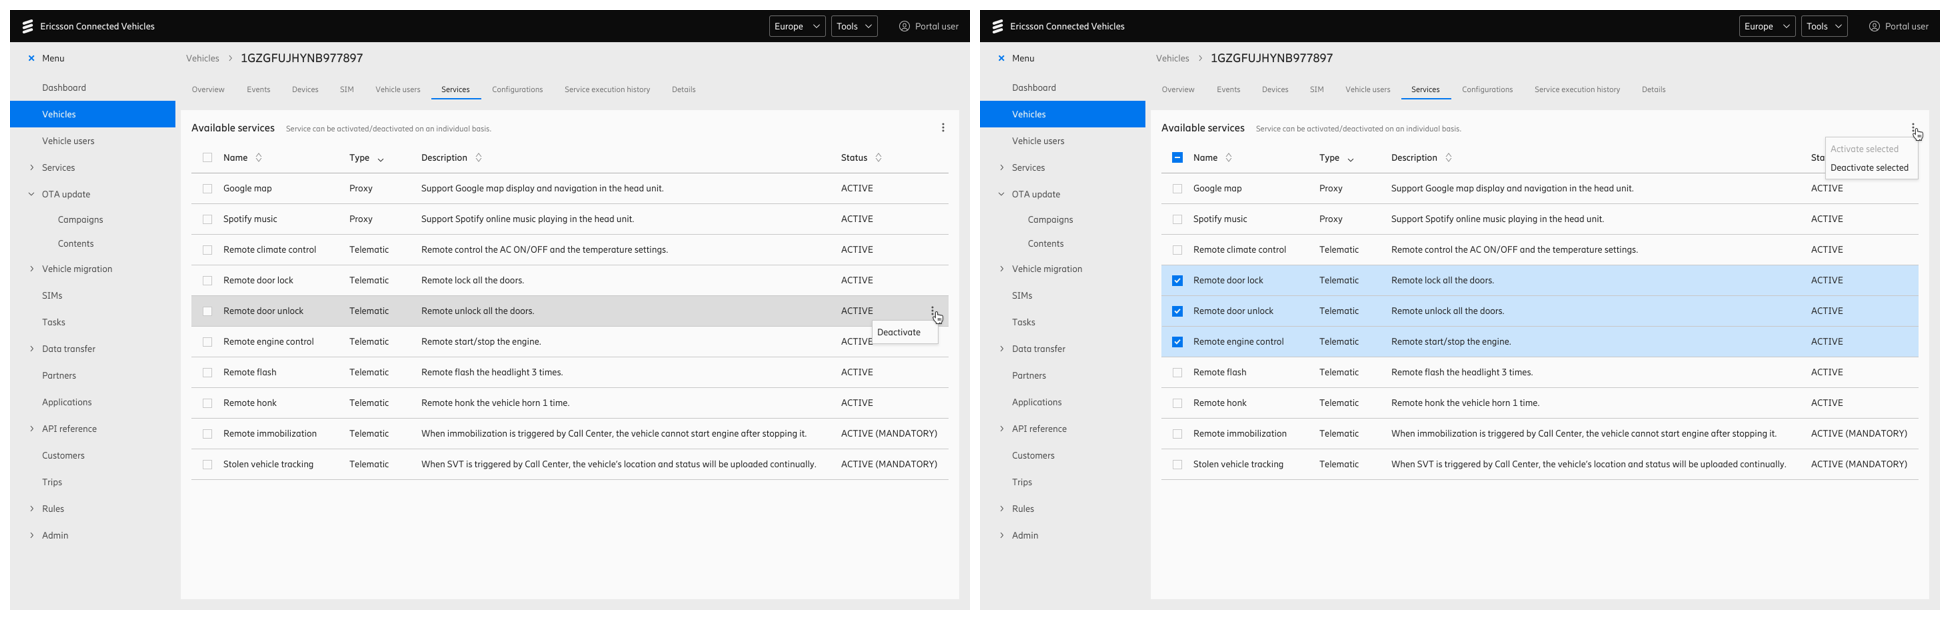
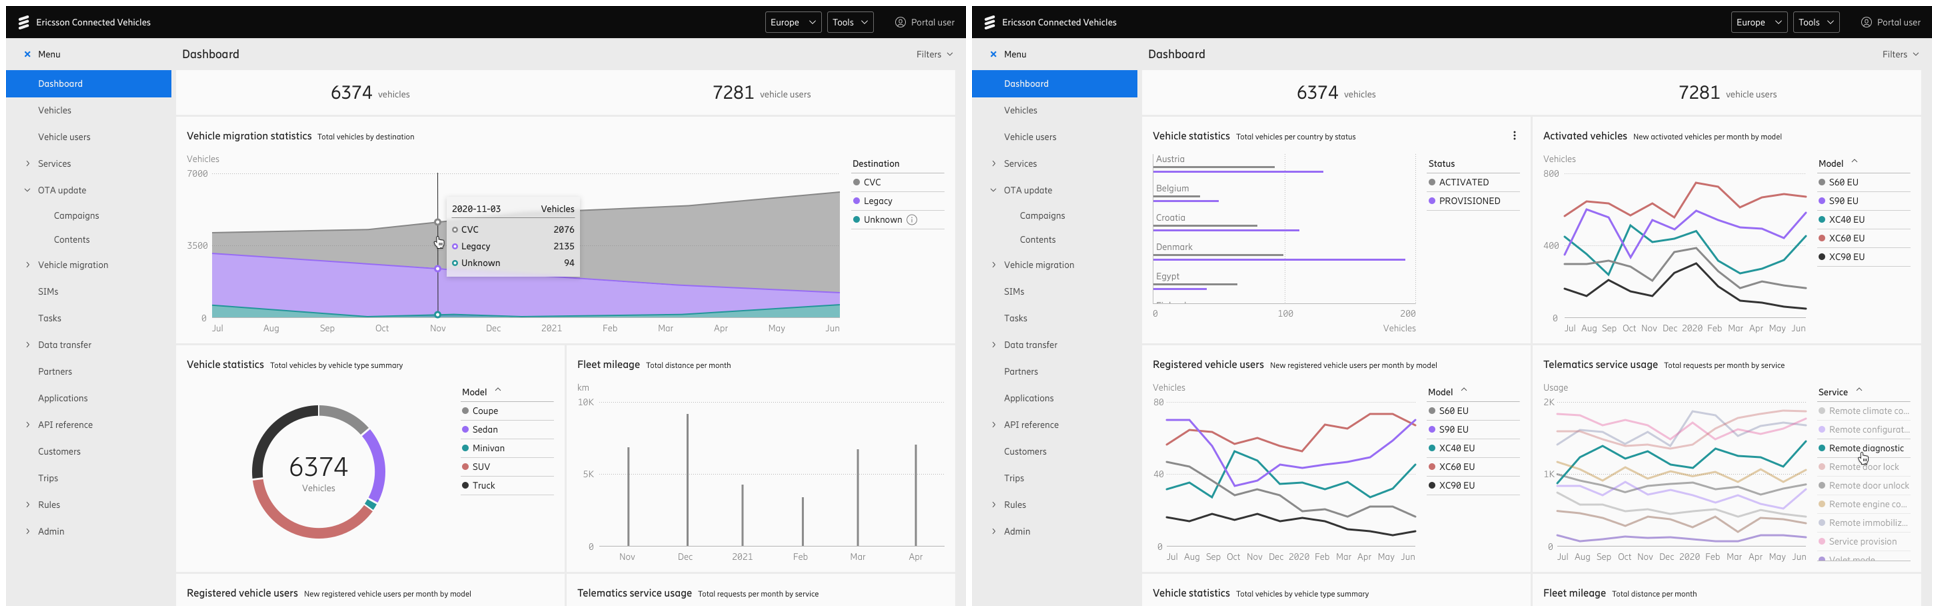
After defining the key actions and steps, we started drawing wireframes and iterated with stakeholders until we reached alignment. We then moved on to the detailed visual design. Below are some samples of the finalized design screens.
OTA Update module:
Vehicle Service Management module:
Data analytics module:
With a flexible design, the main feature modules can be sold as a bundle or individually. For example, clients can purchase the platform with Vehicle Service Management module, or the OTA Update module, or both at the same time.
After the handoff to developers, we reviewed the implementation, provided correction suggestions, and logged any defects that could not be resolved before the internal demo.
Challenge 1: Technical Constraint
Encountering technical constraints is common in product development. When designing the OTA update feature, we noticed that a specific technical constraint was significantly impacting the UX.
Problem statement
When building an OTA update campaign, the campaign manager needed to select the target vehicles based on Country, Model, and Year.
Due to a backend system constraint, an error would occur during campaign execution if the number of vehicles exceeded 10,000.
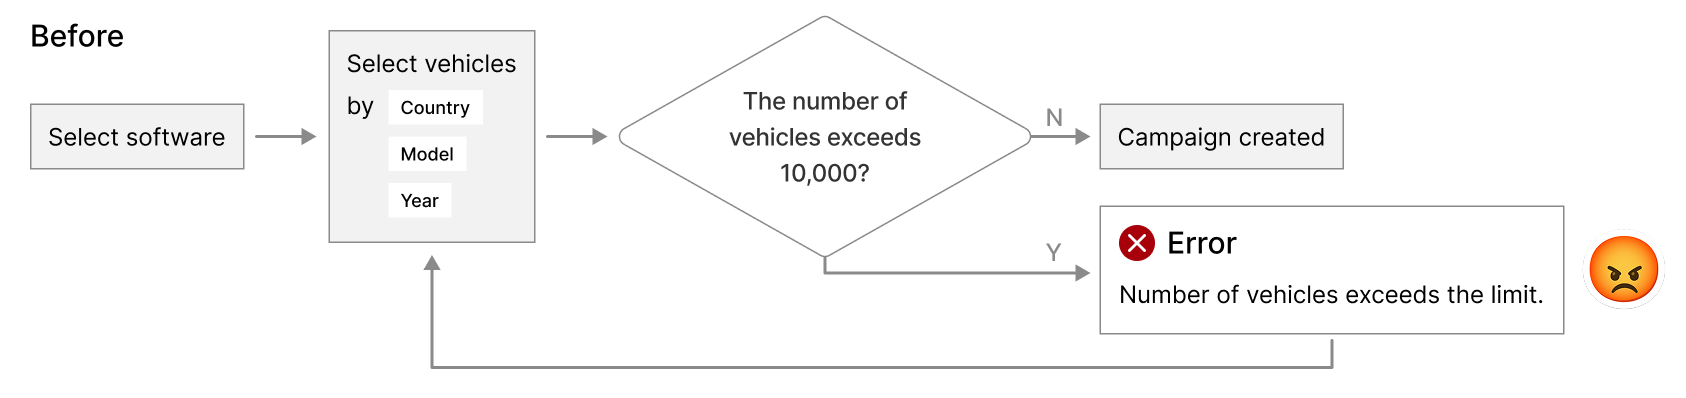
Users had to go back, narrow the selection, run the campaign again, and create additional campaigns for the remaining vehicles. It's a frustrating experience.
Solution
Instead of thinking "how to help users select without exceeding the limit", we designed an approach to automatically split the campaign into smaller sub-campaigns, which contain no more than 10,000 vehicles each.
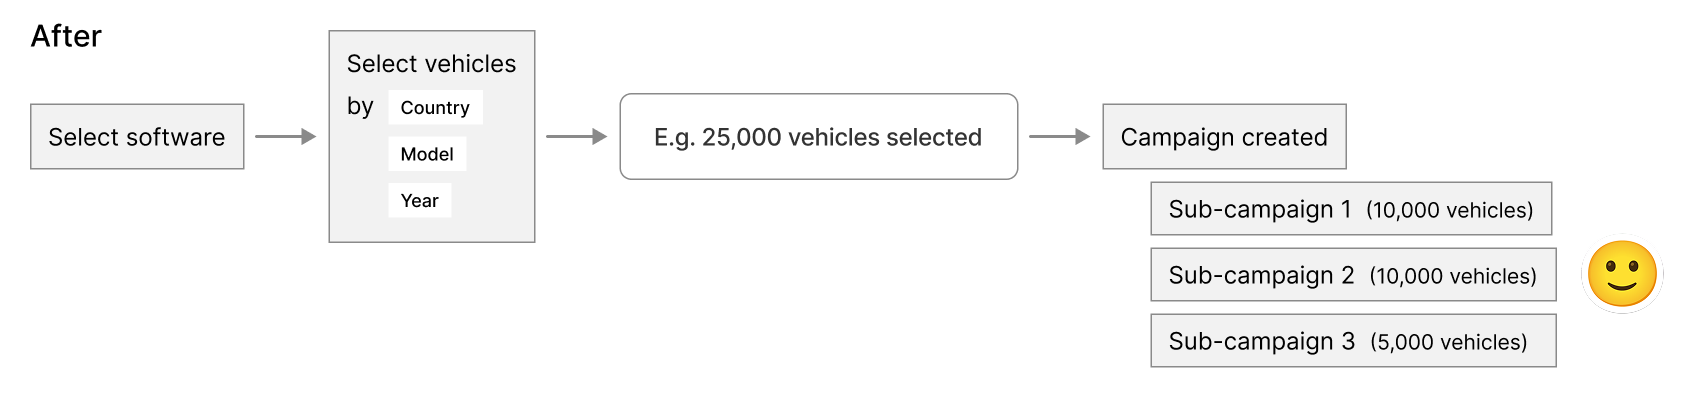
From the user's perspective, these sub-campaigns are manageable as a main campaign, but when sent to the backend, they are standalone campaigns and can be executed with the current system.
When creating a campaign, we allow users to calibrate the campaign by setting the number of vehicles and the maximum data consumption. Once the campaign is set up, users can monitor and manage the main campaign along with its sub-campaigns.
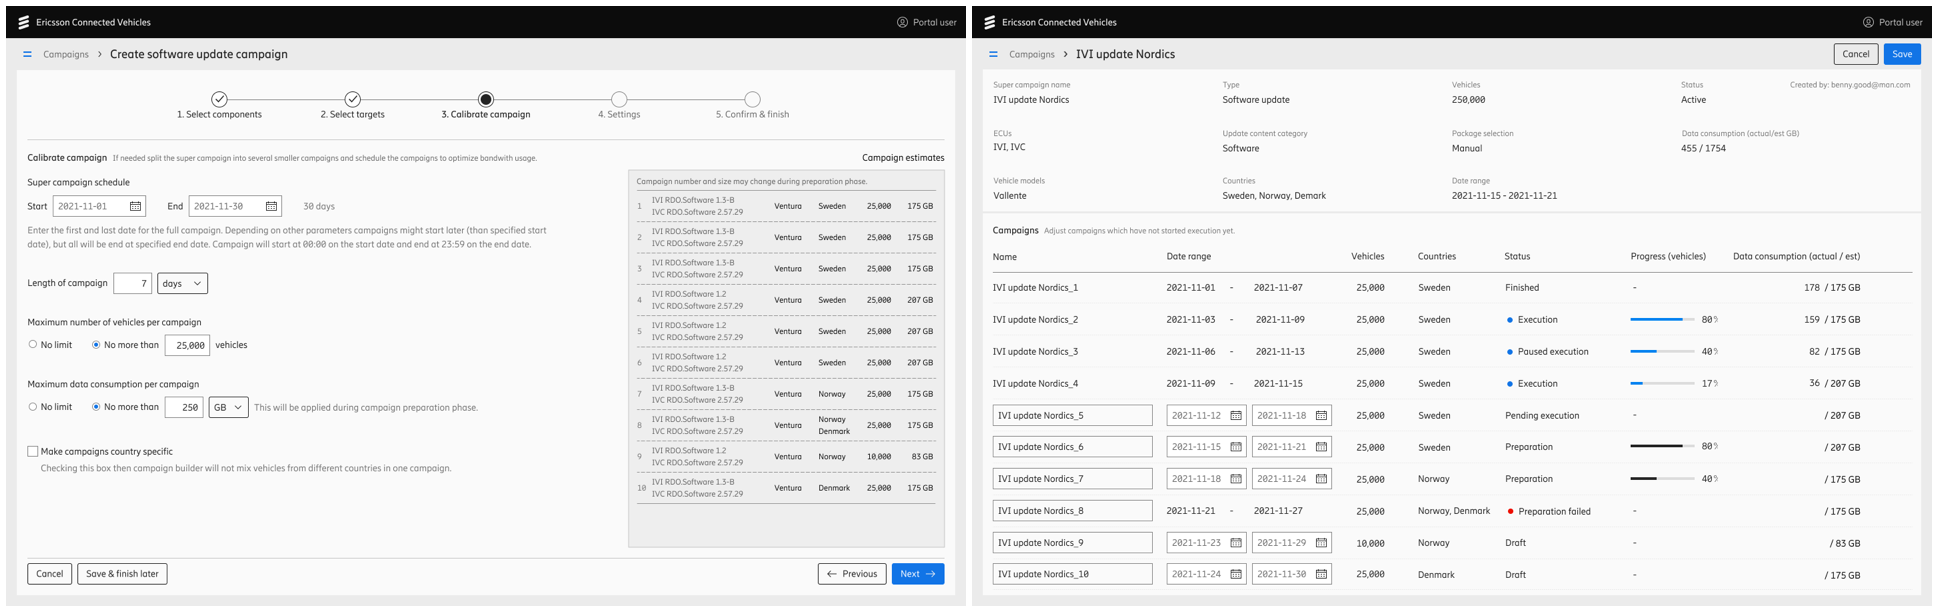
This solution addressed the pain point caused by the technical constraint, making the product more flexible and intuitive.
Challenges 2: Customer Acquisition
Another challenge was at a higher level: when we first launched the product, we didn't win a single contract.
Problem statement
We hardly receive valid feedback if we cannot get real clients using our product in their daily business. We want to support customer engagement from a UX perspective.
As reported by our sales team, potential clients seem to need more clarity on how our connectivity capabilities support the daily operations of automotive OEMs.
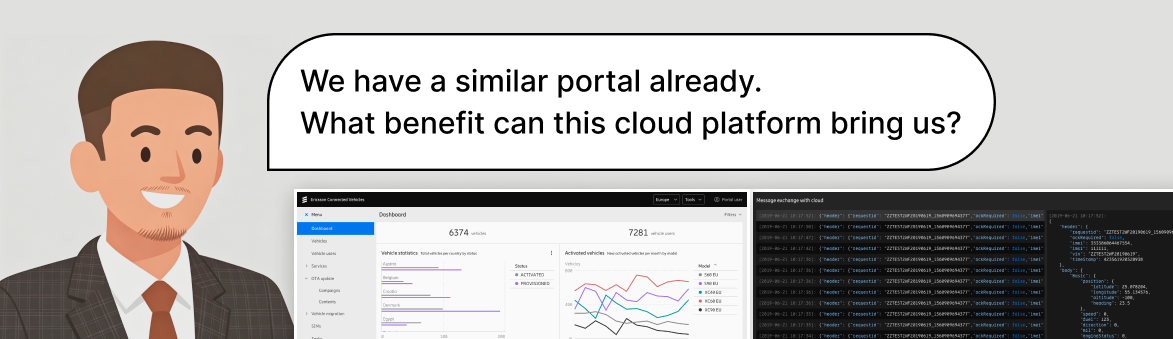
The product demo was filled with command-line and code interfaces.
We realized that simply presenting the product may not be sufficient. To enhance the audience experience, we needed a more effective way to demonstrate the business value our product delivers.
Solution
Low latency is crucial to the connected vehicle business as it directly impacts safety. This is where our superior network capability becomes a key strength of our product.
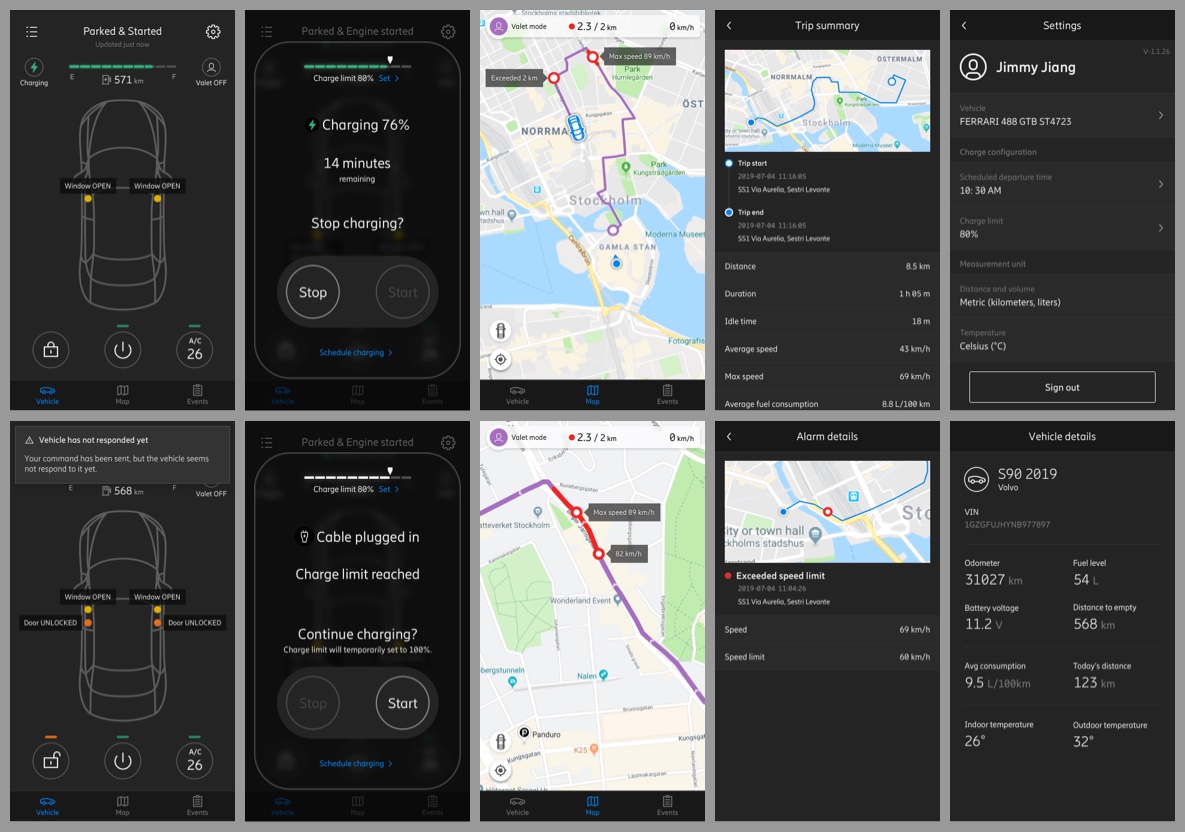
To better showcase our product's performance, we designed a suite of demo tools, including a mobile app, a vehicle simulator, and additional resources. These will help our potential clients intuitively perceive the key advantages of our product in their daily operations.
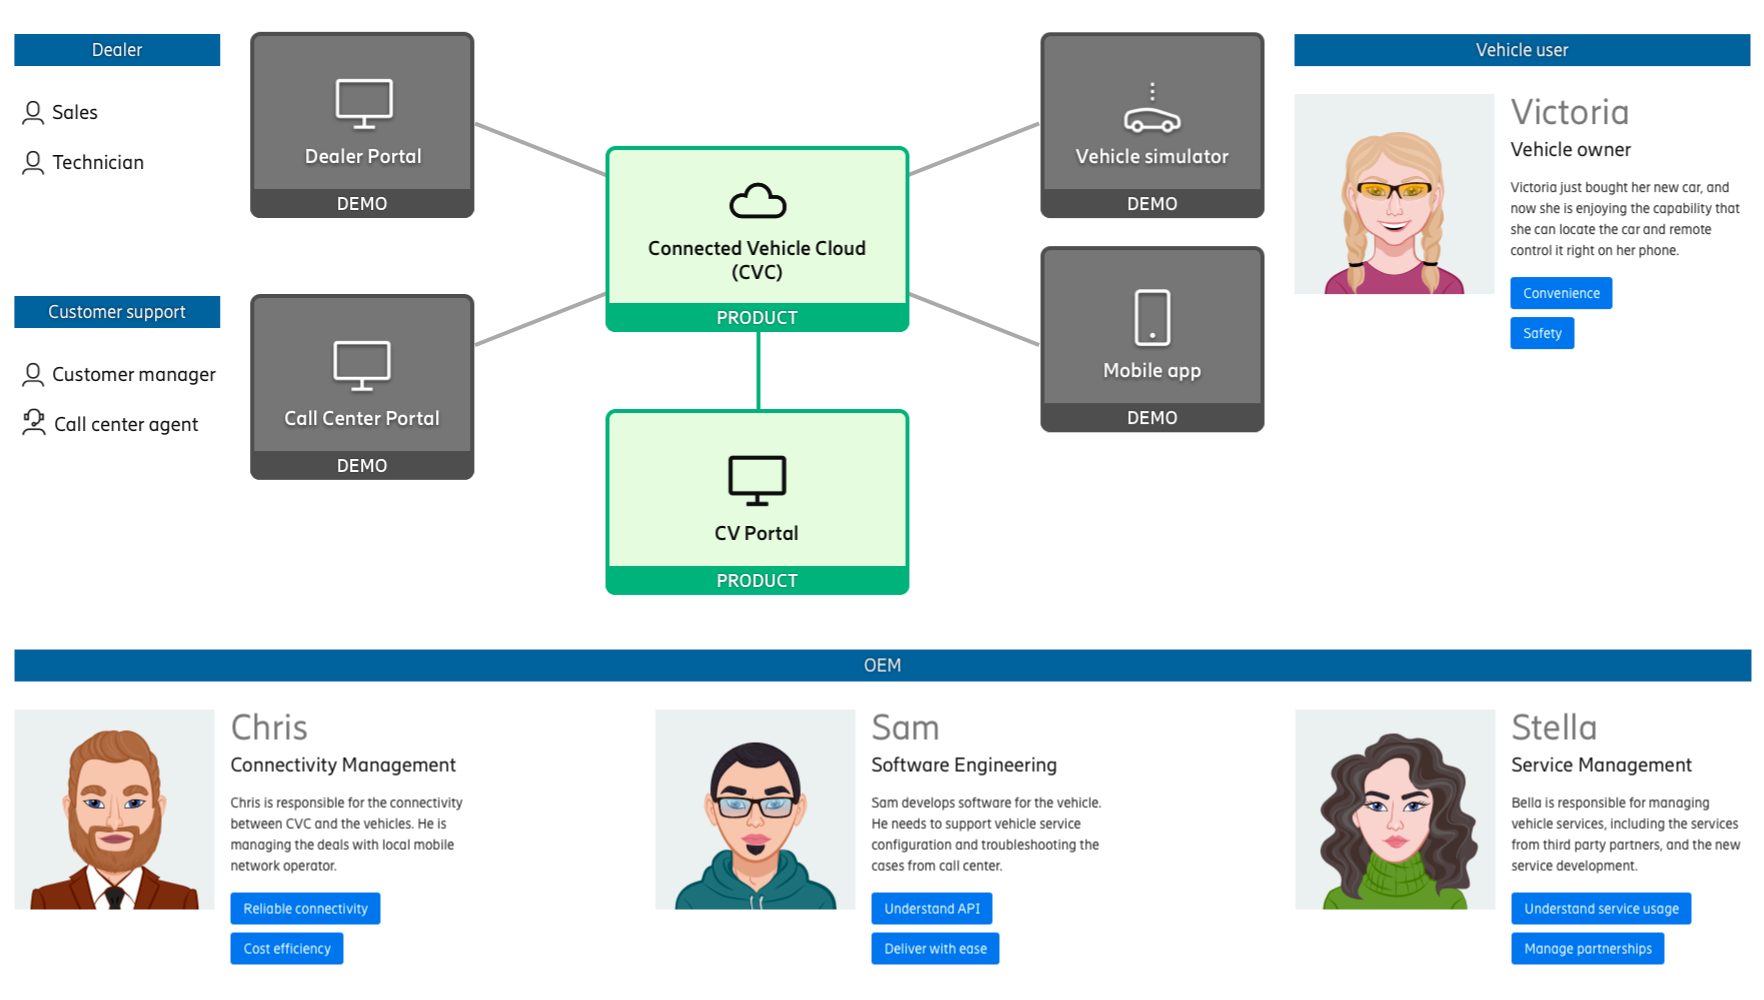
The mobile demo app represents the OEM mobile app, used by the vehicle owner.
The vehicle simulator represents a physical car in the real world.
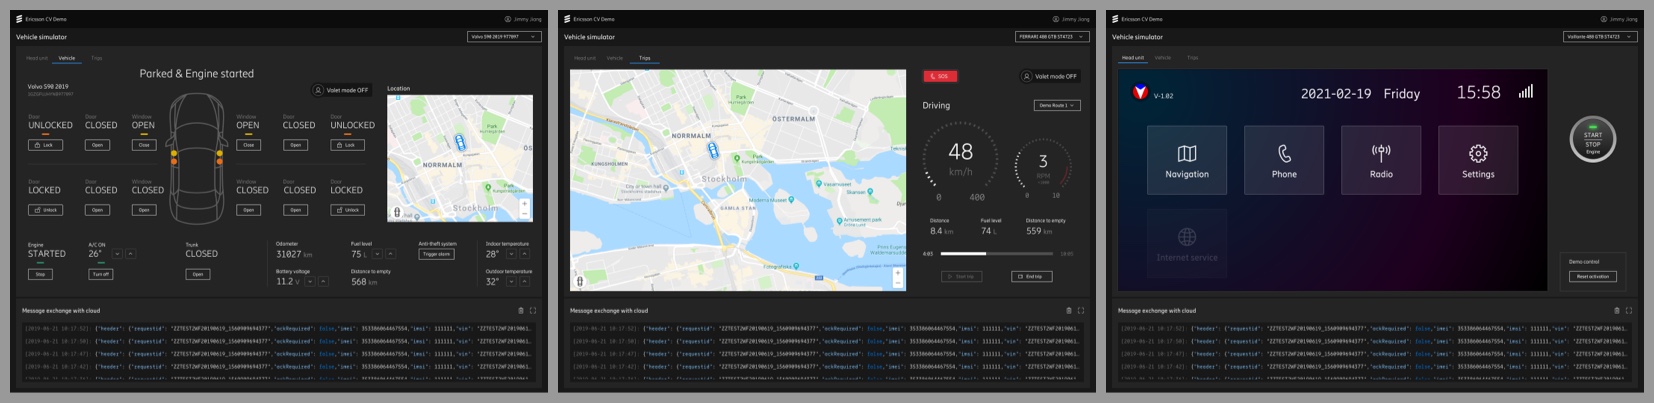
These demo tools help our OEM customers gain an intuitive understanding about what will be improved in the end-user side.
Similar to the general product design process, we also created journey maps, wireframes and drafts for these demo tools before stepping in high-fidelity visual design.
Demo Tools Design Goals
- Prioritize visualizing the demo related features
- Focus on easy-to-understand by viewer
Below is a design of remote control flow and UI feedback in the mobile demo app:
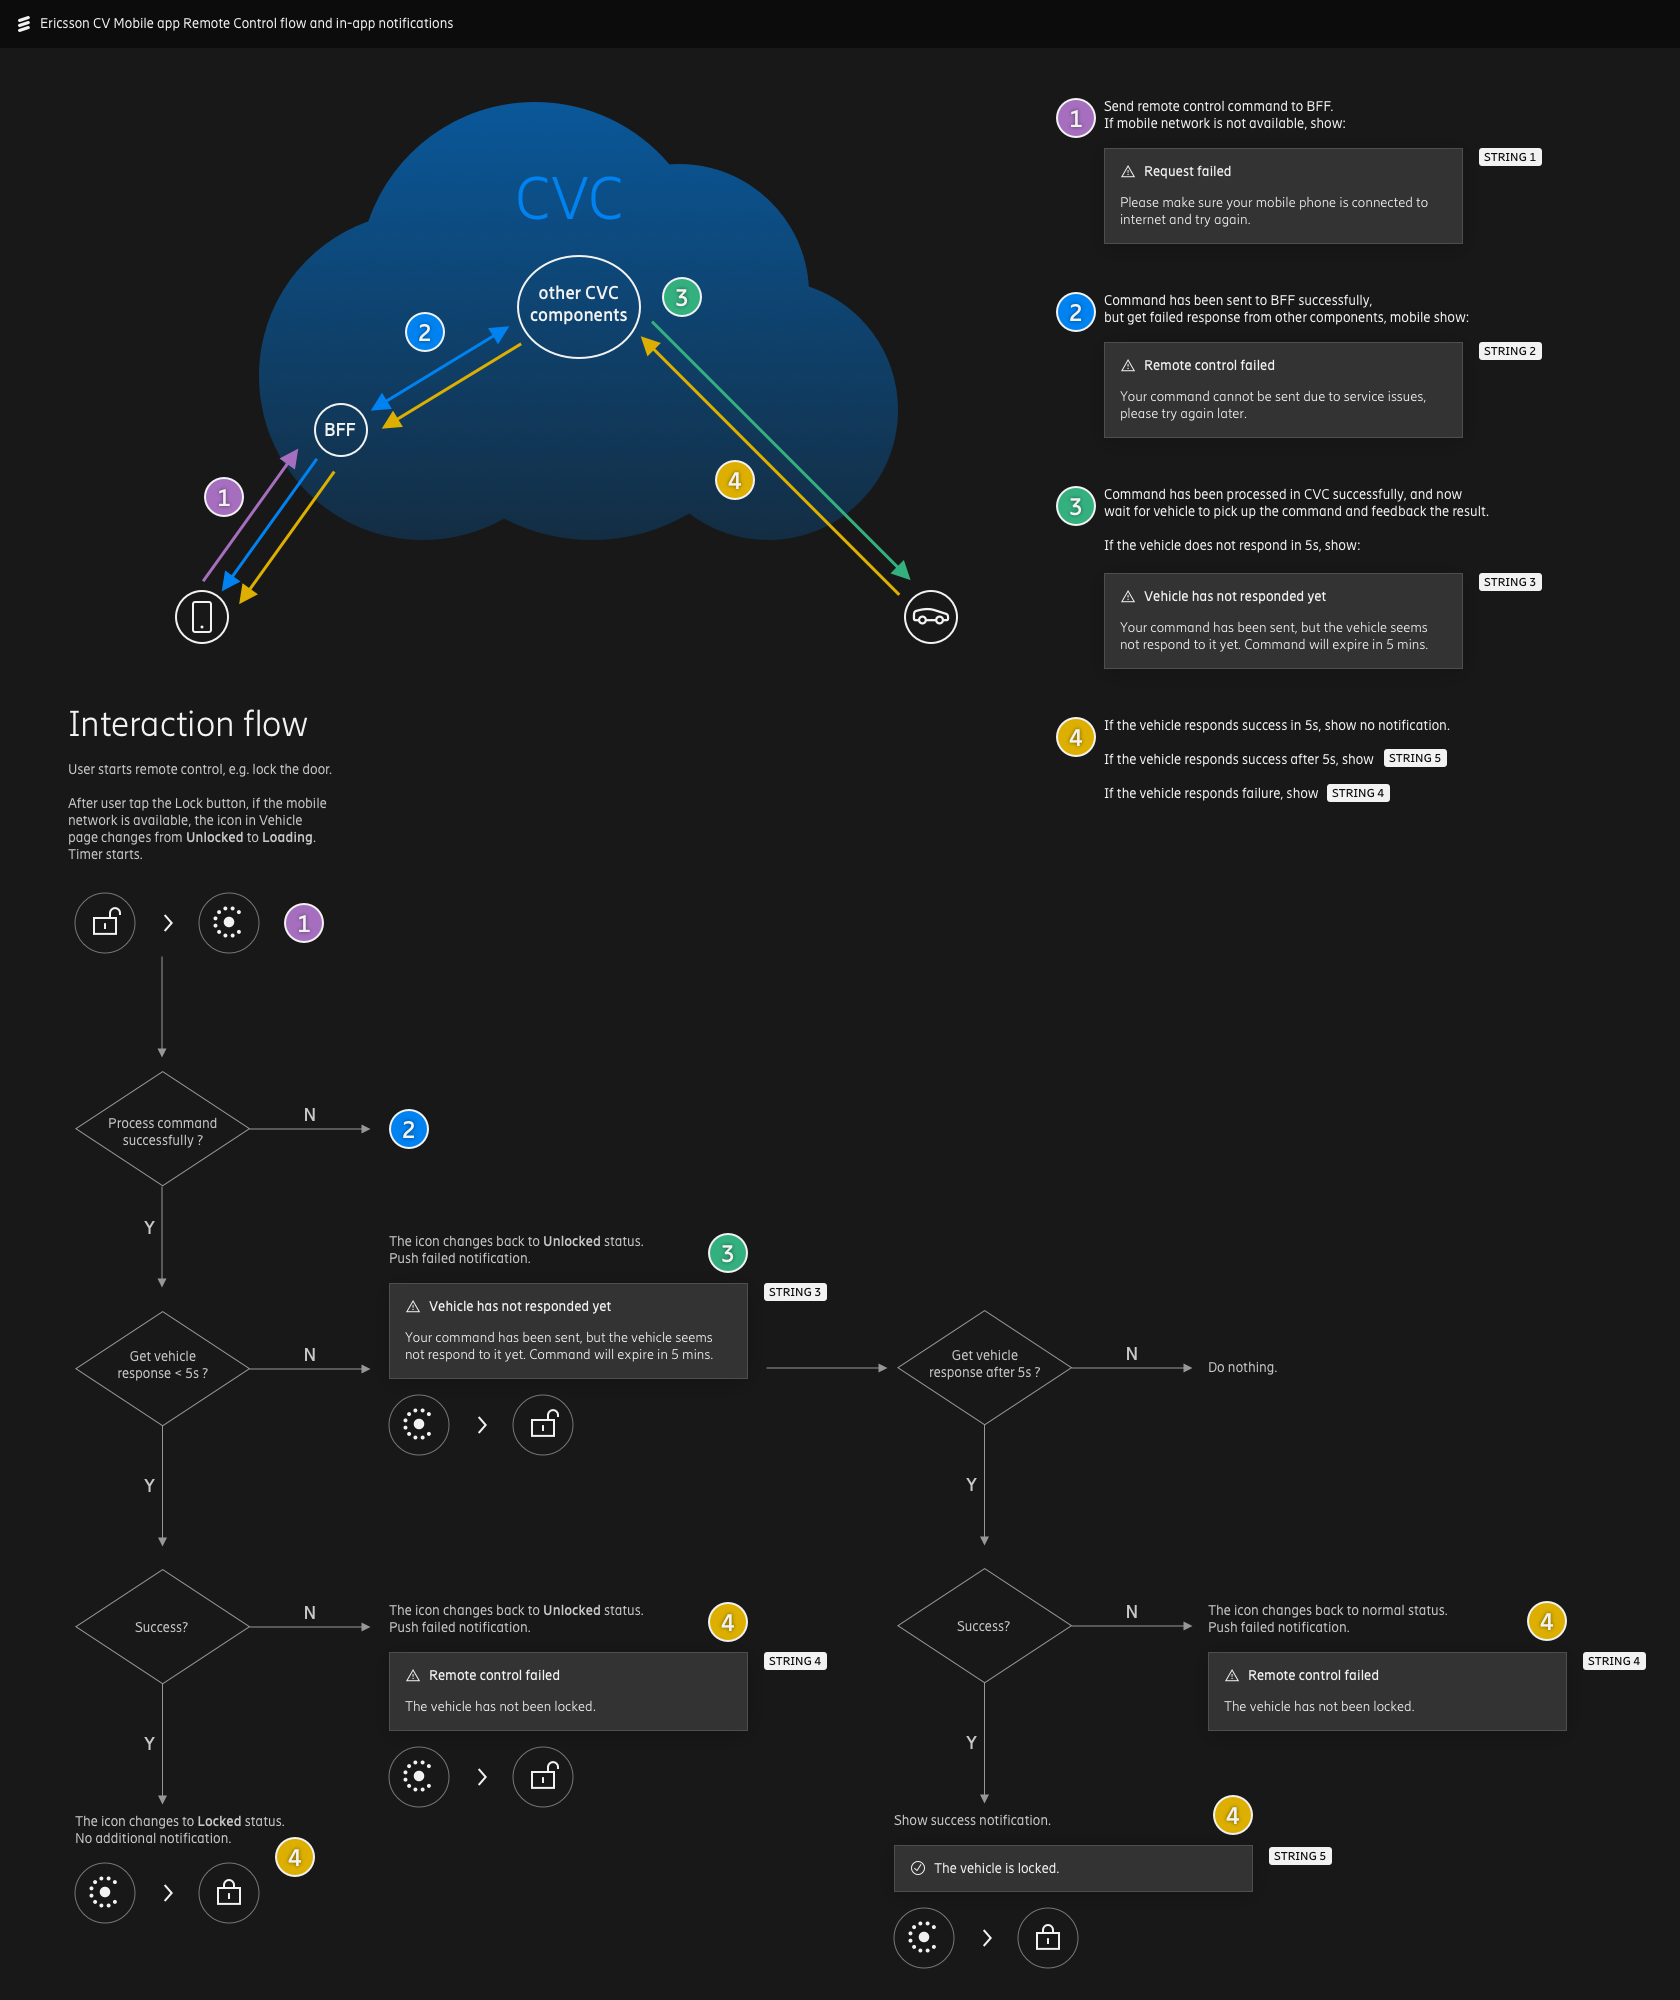
As with all other IoT platforms, users' commands cannot always reach their devices. It's important that we provide clear feedback to the end user in different scenarios.
Below is a user interaction flow design for vehicle services activation in the Vehicle Simulator head unit:
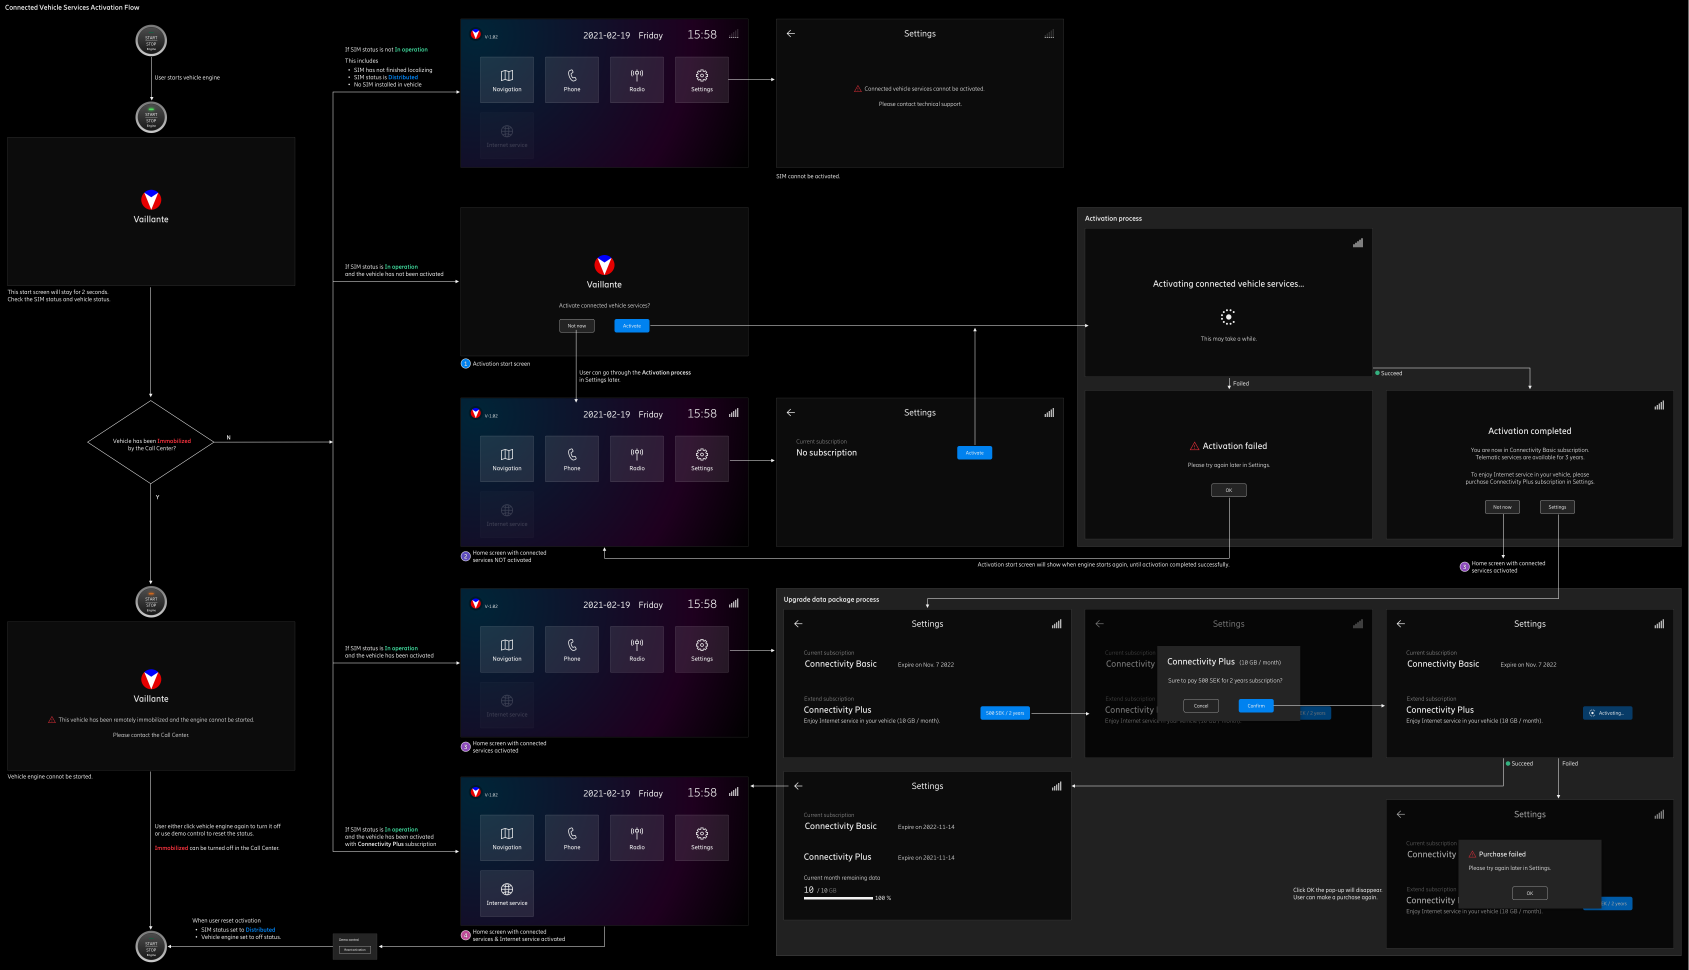
It shows the vehicle services activation flow and detailed feedback for different scenarios in a vehicle's head unit, demonstrating how the product's connectivity capability supports the vehicle user's in-car experience.
Outcome
These demo tools improved the audience experience in the sales process, and helped us win a contract with a client in Europe.
Connected Vehicles platform is designed to be a generic product. After we signed the contact with our customers, there are plenty of design needs to be updated to adapt the customer's system and environment. The product design focus switch from generic user to specific customer, and the customization work may change the existing design significantly.
Below is an example:
Left is the product design screen. Right is the same screen customized for our European client's systems and
environments.
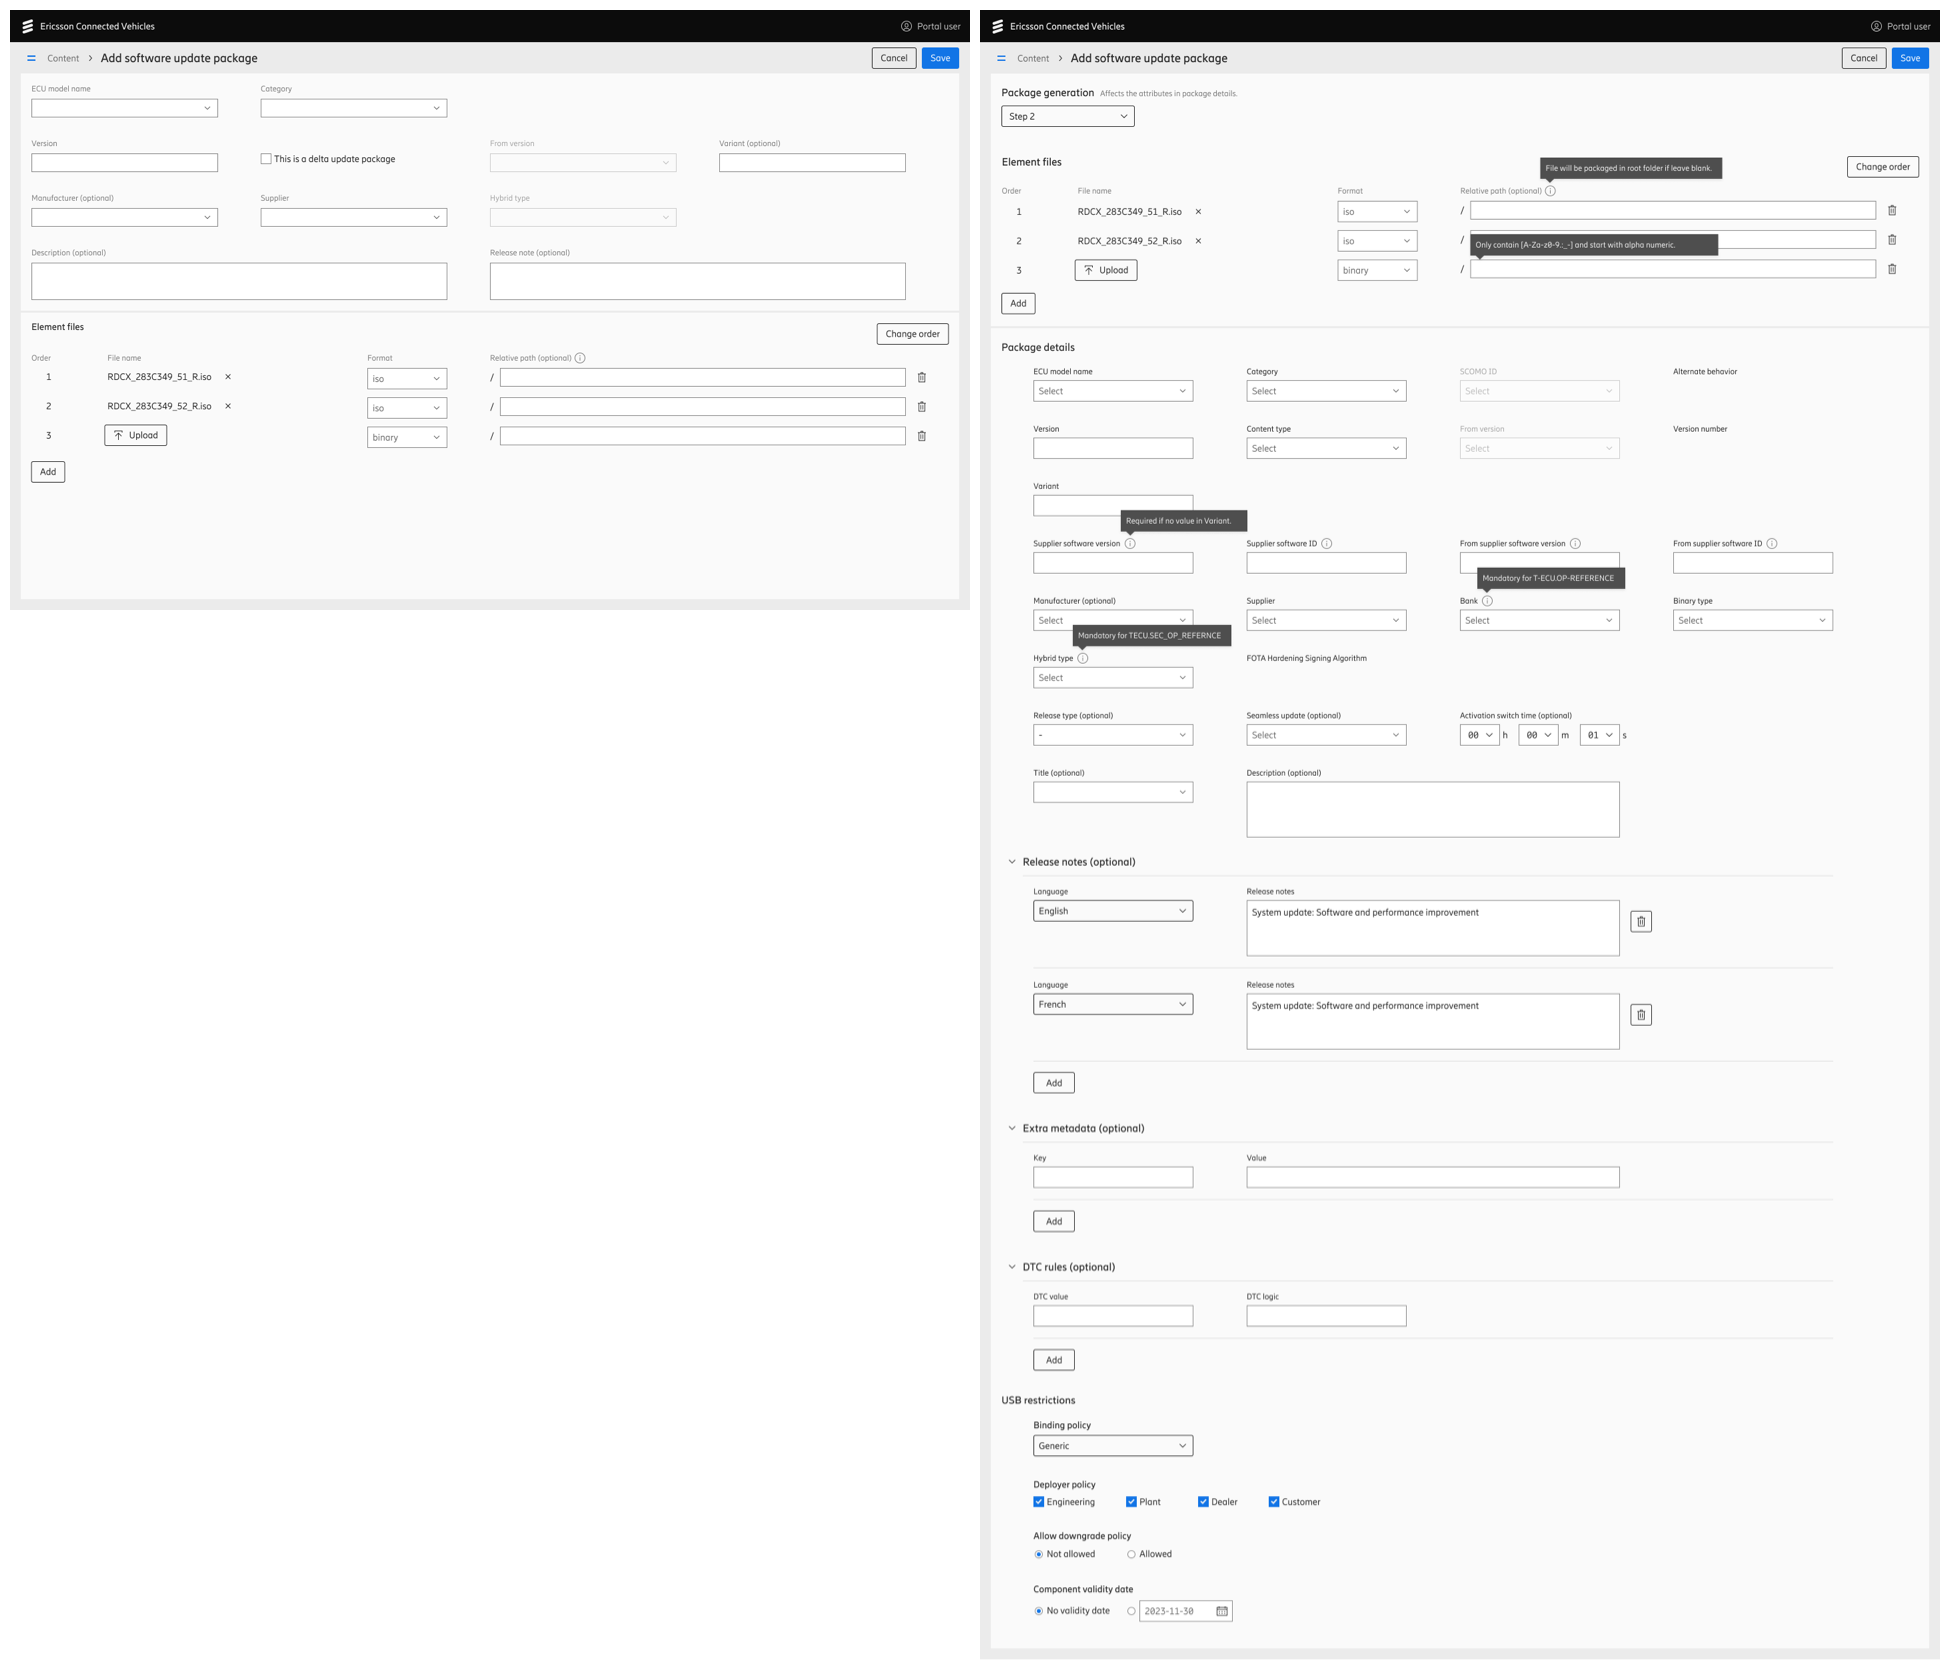
Left: the product design screen | Right: the same screen adapted to client's systems
In the end, the customization experience we learned from this automotive OEM will be used in our next generic product design iteration.
UX Deliver Process
This project runs under SAFe (Scaled Agile Framework). We need to deliver the committed features within each PI (Program Increment), which consists of 4 sprints.
However, UX work sometimes becomes a bottleneck during the development process, as teams wait for designs immediately after PI planning. On the other hand, it's also stressful for designers to deliver all UX deliverables within such a short timeframe. As a result, the development of some features is blocked by UX design in the early stage of each PI.
In order to minimize this impact, I started a way of working called Progressive Delivery, which breaks down the each task into different stages. This allows designers to deliver work step by step, without blocking the developers.
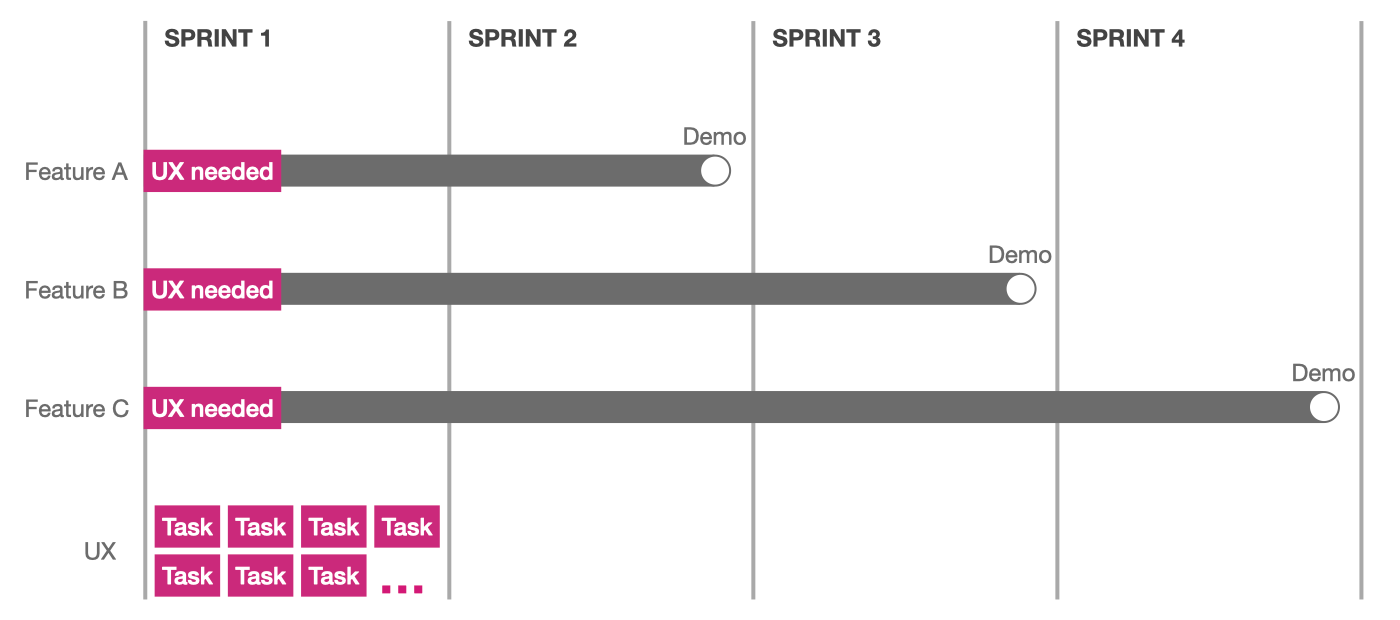
In the first stage, we quickly draft a user flow with key actions and data fields, and iterate with stakeholders, so that everyone has a holistic view of the main interaction and what information will be shown in each step. After aligning with the stakeholders, most developers can start their work without knowing the detailed visual style, as this does not affect the back-end architecture.
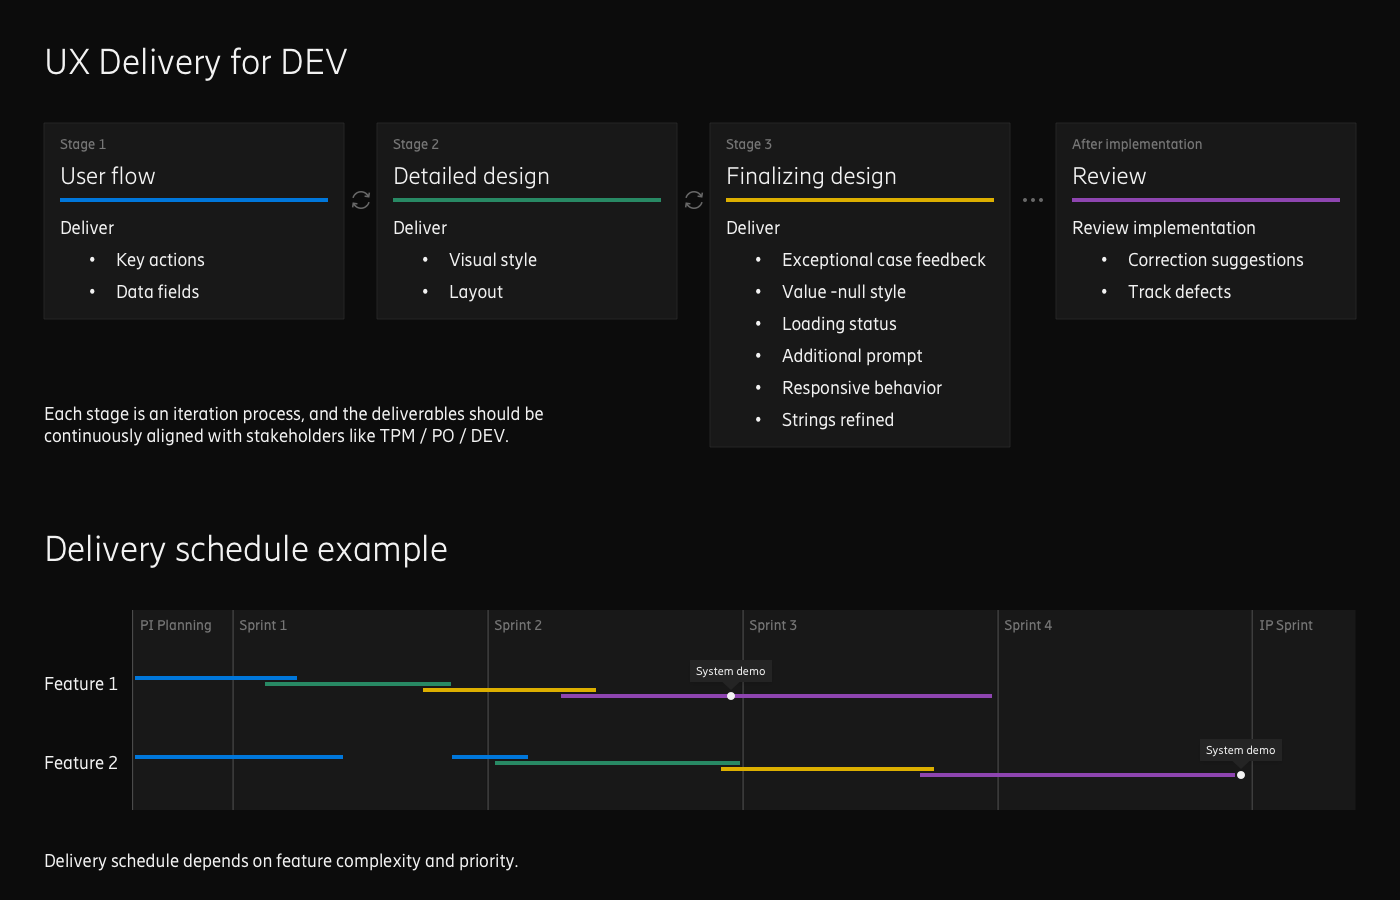
In stage 2, UX designers focus on the detailed visual style (color, typography, layout, etc.), and front-end developers can begin building the GUI once the detailed design is delivered.
In stage 3, UX designers continually monitor the implementation, and provide supplementary design support, such as strings fine-tuning, and design feedback for specific exception cases (usually come up at this stage).
For different features, each stage may take different time and effort to complete, depending on its complexity and priority. No role in the team was blocked throughout the entire PI's development.
By following this UX delivery process, we minimize the waiting time for developers, and also reduced pressure on designers during the early stage of each PI. It helped improve overall feature development efficiency, and I still apply this method today.
Retrospective
Some thoughts and learnings:
- Not only should we focus on the design process, but also on the end-to-end development and delivery process.
- When encountering roadblocks during the client's sales process, considering end users' perspectives may help to find effective solutions.